AI is rapidly advancing, and new tools are popping up almost weekly. One of the newest and most powerful tools you can use to make 3D models for 3D printing from a simple text prompt is Shap-e by OpenAI. In this article, I'll show you exactly how to create any 3D model with a simple text description using Artificial Intelligence.
We will have to use a good amount of code but I promise you that no coding experience is required. Everything you need will be provided in this article.
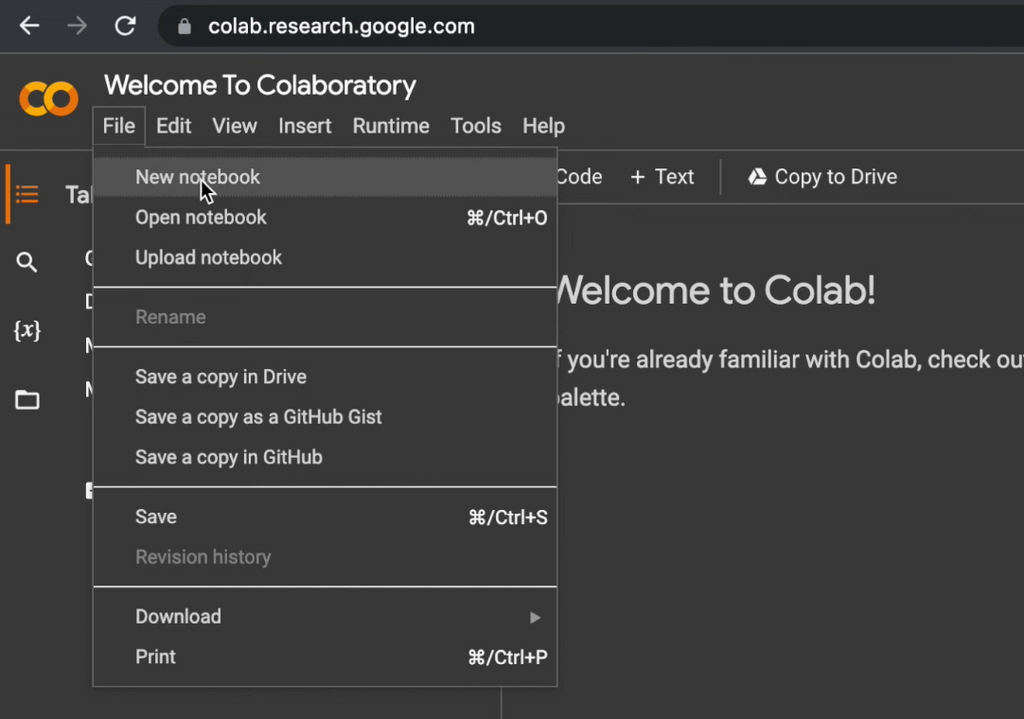
Step 1:
Go to colab.research.google.com ➡️ File ➡️ New Notebook


Step 2:
Go to Edit ➡️ Notebook Settings ➡️ Change "Hardware accelerator" to GPU ➡️ Click save

Step 3:
Paste the following code and press the run button that looks like a play button in a white circle:
# Code snippet #1
!git clone https://github.com/openai/shap-e.git

Step 4:
Paste the following code and press the run button:
# Code snippet #2
%cd shap-e

Step 5:
Once again, paste the following code and press the run button:
# Code snippet #3
!pip install -e .

Step 6:
And again, paste the following code and press the run button:
# Code snippet #4
import torch
from shap_e.diffusion.sample import sample_latents
from shap_e.diffusion.gaussian_diffusion import diffusion_from_config
from shap_e.models.download import load_model, load_config
from shap_e.util.notebooks import create_pan_cameras, decode_latent_images, gif_widget

Step 7:
...and again, paste the following code and press the run button:
# Code snippet #5
device = torch.device('cuda' if torch.cuda.is_available() else 'cpu')

Step 8:
And once again, paste the following code and press the run button:
# Code snippet #6
xm = load_model('transmitter', device=device)
model = load_model('text300M', device=device)
diffusion = diffusion_from_config(load_config('diffusion'))

Step 9:
Now we have everything set up and we can start generating our 3D model directly from a simple text prompt. Copy and paste the following code snippet which contains a line where we can type our prompt. By default the prompt is set to "shark":
# Code snippet #7
batch_size = 4
guidance_scale = 15.0
prompt = "shark"
latents = sample_latents(
batch_size=batch_size,
model=model,
diffusion=diffusion,
guidance_scale=guidance_scale,
model_kwargs=dict(texts=[prompt] * batch_size),
progress=True,
clip_denoised=True,
use_fp16=True,
use_karras=True,
karras_steps=64,
sigma_min=1e-3,
sigma_max=160, s_churn=0,
)

Step 10:
We have successfully generated a shark but in order to see it we will have to have it rendered. Paste and run the following code to render our 3D model:
# Code snippet #8
render_mode = 'nerf' # you can change this to 'stf'
size = 128 # this is the size of the renders; higher values take longer to render.
cameras = create_pan_cameras(size, device)
for i, latent in enumerate(latents):
images = decode_latent_images(xm, latent, cameras, rendering_mode=render_mode)
display(gif_widget(images))

Step 11:
We are almost done. Lastly we will need to save the 3D models. Copy, paste, and run the following code to save the mesh:
# Code snippet #9
# Example of saving the latents as meshes.
from shap_e.util.notebooks import decode_latent_mesh
for i, latent in enumerate(latents):
t = decode_latent_mesh(xm, latent).tri_mesh()
with open(f'shark_mesh_{i}.ply', 'wb') as f:
t.write_ply(f)
with open(f'shark_mesh_{i}.obj', 'w') as f:
t.write_obj(f)
Step 12:
We have now saved the meshes in our Google colab project and can find them by clicking on the white folder icon on the left hand side of the screen. Open the Shap-e folder and click on the three dot next to the .ply file that you wish to download. Click download.

Step 13:
Now finally we can import the .ply files into Blender to make any adjustments. In Blender, go to File -> Import -> Stanford (.ply)
After making any necessary modifications to your 3D model, simply export the mesh as an STL file and load it into your slicer of choice.
You can see the whole process on the 3D Printer Academy - Tutorials YouTube channel: